Iedomājieties tik, fotogrāfi arī ir žurnālisti. Protams, ne jau visi, bet tomēr lielākā daļa to, kas fotografē notikumus un piedāvā tos skatīt lielām masām, ir žurnālisti.
1. «Jūs esat tikai fotogrāfs vai rakstat arī?»
2. «Un tas ir mans fotogrāfs, Jānis Bērziņš.» (Saka žurnālists, iepazīstinot sevi ar intervējamo personu).
3. «Mums ir jāazpilda lapa, aizej un pasaki fotogrāfiem, lai iet un kaut ko atrod.»
4. «Viss, kas man ir vajadzīgs, ir portrets.»
5. «Vai ir arī kaut kas cits?» vai arī «Tev ir kaut kas labāks par šo?» (Uz ko viena no atbildēm varētu būt «Jā, bet šodien mēs izvēlamies tikai trešo labāko».)
6. «Vai par šo personu kaut kas ir arī rakstā?»
7. «Vai tev ir bilde ar to cilvēku priekšplānā?»
8. Jebkurš izteikums ar mēģinājumu atrast atškirības starp rakstošajiem un fotografējošajiem.
9. «Šīvakara futbola spēlē nofotografē man lūdzu vertikālu bildi, jo es jau esmu salauzis (samaketējis) lapu un nodevis to redaktoram».
10. «Raksts jau ir uzrakstīts un mums tikai vajag aizskriet un noknipsēt to džeku».
11. «Lūk ko mēs vēlētos redzēt kā galveno bildi…»
12. «Nē, tu nevari nākt uz interviju. Tas cilvēks nekad pilnībā man neatvērsies, ja blakus būs fotogrāfs».
13. «Pamēģini uztaisīt labu fotogrāfiju. Mums vajag lapas centrālo bildi».
Es neesmu USA Today auditorijas pārstāvis, tomēr šis pa pus pasauli pagājušajā nedēļā izskandinātais muļķīgais izgājiens nevarēja palikt nepamanīts.
Kaut arī zināšanas par aizpeļķes iedzīvotājiem un viņu tautas varoņiem nav īpaši lielas, tomēr par Raisas kundzi priekšstats lielākoties cilvēciņiem tomēr būs iesēdies. Nopietna tante, galu galā.
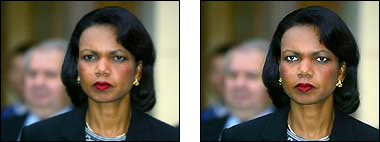
Tad nu kā gadījies, kā ne, viens no svarīgākajiem ASV izdevumiem publicē 19. oktobrī rakstu par savas nācijas karaspēka gaitām tuvākajos 10 gados, kuros iesaista arī tantes Raisas izteikumus. Nu un protams, pievieno The Associated Press fotogrāfa bildi. Viss jau būtu labi, ja tikai fotonodaļā kāds nebūtu pārcenties ar Sharpen filtru lietošanu, kas noveda pie savdabīgiem rezultātiem:
Pa kreisi mēs redzam bildes oriģinālo versiju, pa labi — nedaudz pielaboto. Brēka sākās ļoti nopietna un tagad pie jau minētā raksta «Rice won’t rule out U.S. troops in Iraq in 10 years» ir lasāma arī redaktora piezīme:
Editor’s note: The photo of Condoleezza Rice that originally accompanied this story was altered in a manner that did not meet USA TODAY’s editorial standards. The photo has been replaced by a properly adjusted copy. Photos published online are routinely cropped for size and adjusted for brightness and sharpness to optimize their appearance. In this case, after sharpening the photo for clarity, the editor brightened a portion of Rice’s face, giving her eyes an unnatural appearance. This resulted in a distortion of the original not in keeping with our editorial standards.
Cilvēkam parasti liekas, ka ir labāk tur, kur viņa nav.
Un viņš nekad neuzzinās, kā ir īstenībā, kamēr pats tur nebūs bijis. Ar darba vietām ir tā, ka vienmēr būs kaut kas, kas tevi neapmierina. Ja ir labs kolektīvs, tad ir slikti darba apstākļi. Ja ir slikts kolektīvs, tad cieš viņus tikai labas algas dēļ. Ja ir labs gan kolektīvs, gan alga, tad ir galīgi garām priekšnieks un vēl tālu no mājām jābrauc, utml.
Un tu turies, kamēr neparādās papildus kaitinošie faktori, un tad riskē un aizej meklēt laimi citā kolektīvā, ar citu algu, citu priekšnieku utt. Bez jebkādas garantijas, ka tur tiešām būs labāk. Viss ir atkarīgs no kritērijiem.
Tiem, kas vēl nav pazīstami ar «2005 Adobe Design Achievement Awards» ir noteikti jāielūkojās un jāpapēta, ko no visas pasaules tik studenti un pasniedzēji nesameistaro.
Cienījamā un augsti godātā Colla padeva ziņu, ka es jau otro gadu esmu palaidis garām Pan-baltic Images semināru, kas norisinās Latvijas televīzijas paspārnē.
Īsumā: domāju, ka daudziem būs interesanti iepazīties ar to, kā saražoto varētu kaut kur arī saglabāt un kā to darīt. Bez tam daudz interesantas lietas arī par dažādo masu mediju iekšējo darba specifiku, bet jo īpaši tas varētu būt interesanti tiem, kas paši jau ņemas masu medijos.
Tas nebūt nebūtu smieklīgi, tas nebūt nebūtu traģiski vai ārprātīgi. Ja vien runa nebūtu par 100 000 tirāžā izlaistu kasti, kuru iepirkuši aizpeļķes iedzīvotāji savas muļķības dēļ par neadekvātu naudiņas daudzumu.
PlayStation box for sale. Next time read the description, moron.
Ar jauku ziņu pārsteidza Quark VS InDesign «InCopy CS2, the World; World, InCopy CS2» – ir iznākusi jaunā InCopy versija. Programma būtībā sākotnēji ne ar ko īpaši neatšķīrās no InDesign iebūvētā Story Editor, bet tagad gan InCopy var dēvēt par īstu atradumu jebkuram, kuram ir sakars ar redakcionāliem darbiem, zīmju skaitīšanu maketos un vairākiem cilvēkiem, kas atbild par saturu, jo es nevaru iedomāties, kā vēl ērtāk varētu paskaidrot dumam žurnālistam, ka 1100 zīmes neielīdīs tur, kur ir paredzētas 900.
InCopy CS2 paralēli padara ērtāku arī darbu ar daudziem teksta failiem, jo sadarbojoties ar Adobe Bridge tiek veidotas kopnes, kas satur vairākus dažādus tekstus un līdz ar to, strādājot ar lielāka apjoma tekstiem nebūs problēmas arī ar failu kolekcionēšanu. Daži jau drosmīgi ir piedēvējuši Microsoft Word tuvojamies nāvei, bet domāju, ka tie, kas reāli strādās ar InCopy sapratīs, kam tas ir domāts un ko tas atvieglo.
Silti iesaku iepazīties, tāpēc Adobe InCopy uz vietu, kur viss par to ir rakstīts un ir iespējams iegūt demo versiju, kas funkcionēs 30 dienas.
Shown at the moment in the Ravenstein gallery in Brussels (22 Sept 2005 – 30 Oct 2005), the NIVEArt exhibition presents a perfect example of a project where Art meets Business, where YPU collaborates with NIVEA. After the wide success of the NIVEArt exhibition, the YPU team made especially for FOTO Antwerpen 2005 a more artistic oriented selection of the photographic work.
Young Photographers United is pleased to invite you to the ‘WOMEN IN PERSPECTIVE’ exhibition – Kammenstraat (15 oct 2005 – 30 Nov 2005). Vernissage: Kammenstraat 86, Coiffure Stan, Antwerp from 5pm on the 15th of October.
“Visuals” and “Boc Art & Business”.
This projects takes place in multiple locations in the city, it also presents divers activities, besides the exhibitions, like workshops, lectures and conferences. You can find more information online at: http://www.ypu.org/FotoAntwerpenperstekst_en.pdf.
Young Photographers United (YPU) is an international photographers’ platform that aims to promote photography by supporting young photographers as they launch their professional and artistic career. Since 2001, YPU pumps in young blood into the photography world. YPU unites photographers from all over the world regardless of nationality, religion, colour or gender. The platform has now grown to a collective of 150 photographers based around the world and strongly anchored in Europe.
YPU brings “art” and “commerce” together in unique and inspiring projects strong of a close collaboration with the involved parties. The turnout is a spectrum of smart and original projects where high quality visuals are combined with a multi-cultural approach.
NIVEArt and the follow up exhibition, which we present to you now, are examples of such partnerships where the collective as a whole strives to create a collection of images for branding that also result in a large and inspiring exhibition. Not only the images fit the visual expectations of the brand for its communication but the high standard of the work produced can be presented in an exhibition, which is part of a internationally recognized Photo festival.
YPU is on a constant look out for new opportunities by generating new project concepts, engaging with new partners and widening its international management team. Forever striving to be on the brink of something new in the art and photography world.
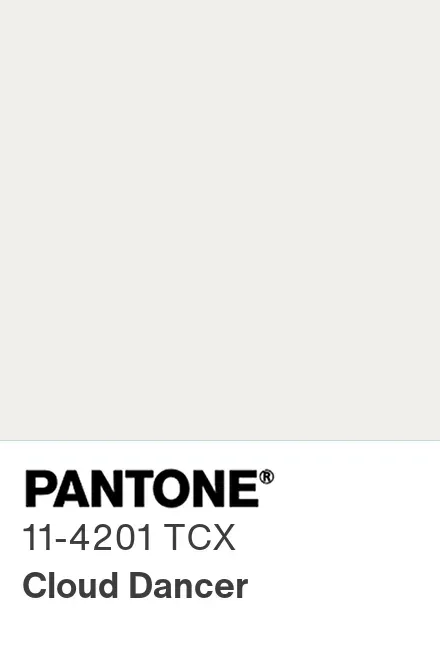
Ik gadu Pantone kādu no savu katalogu toņiem pasludina par gada krāsu. Šoreiz izvēlēts tonis 11-4201 TCX. Īsumā — lai dabūtu šo toni uz papīra, ir vienkārši jāizvēlās atbilstošs papīrs un tas nemaz nav jāapdrukā.
Sāksim ar būtiskāko. Pantone gada krāsa nepadara sliktu attēlu lielisku, nesalabo krāsu profilu un neliek UV lakai uzvesties pieklājīgāk uz nepārklātiem materiāliem. Tā neglābj slikti izvēlētu papīru un nepadara bēdīgu maketu par izcilu. Bet tā izskatās labi mārketinga atskaites prezentācijā — it īpaši, ja slaidā nav jārunā par realitāti.
Mūsdienās kalibrēts ekrāns ir sastopams retāk kā braucošs Volvo 760. Līdz ar to precīzām krāsu referencēm digitāli nav vispār nekādas nozīmes. Der aptuvenais kaut kas. Savukārt spektrālie mērījumi raupjam, nelīdzenam materiālam ir diezgan liels piedzīvojums. Tāpēc tekstila industrija lielākoties joprojām paļaujas uz reāliem, fiziskiem paraugiem.
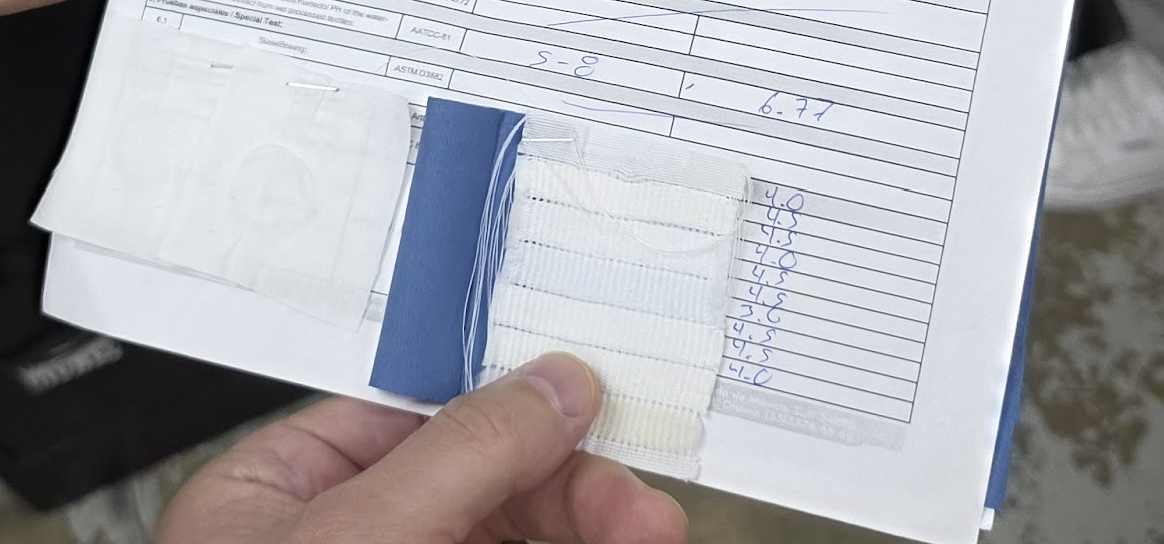
Klasiska krāsota materiāla reference: nekrāsots, bāzes paraugs; krāsots paraugs; dilumnoturības tests. Papildus vēl var nākt arī protokolētie spektrālie mērījumi un specifiski, audumiem raksturīgie testi.
Kā jau raženi un pieredzējuši informatīvās miskastes ražotāji, Pantone ir radījuši TCX katalogu (Pantone Textile Cotton Extended). Tas ir paredzēts krāsotai kokvilnai un nozīmē dažādu krāsiņu paraugu vēdekli, ar kuru spēlēties dizaineriem. Turklāt ļoti dārgu vēdekli, tāpēc arī tā reklamēšanā tiek ieguldīti tik lieli līdzekļi. Tekstila nozarē katram ražotājam parasti tādi katalogi ir pašam un tie balstās uz saražotās produkcijas vēsturi.
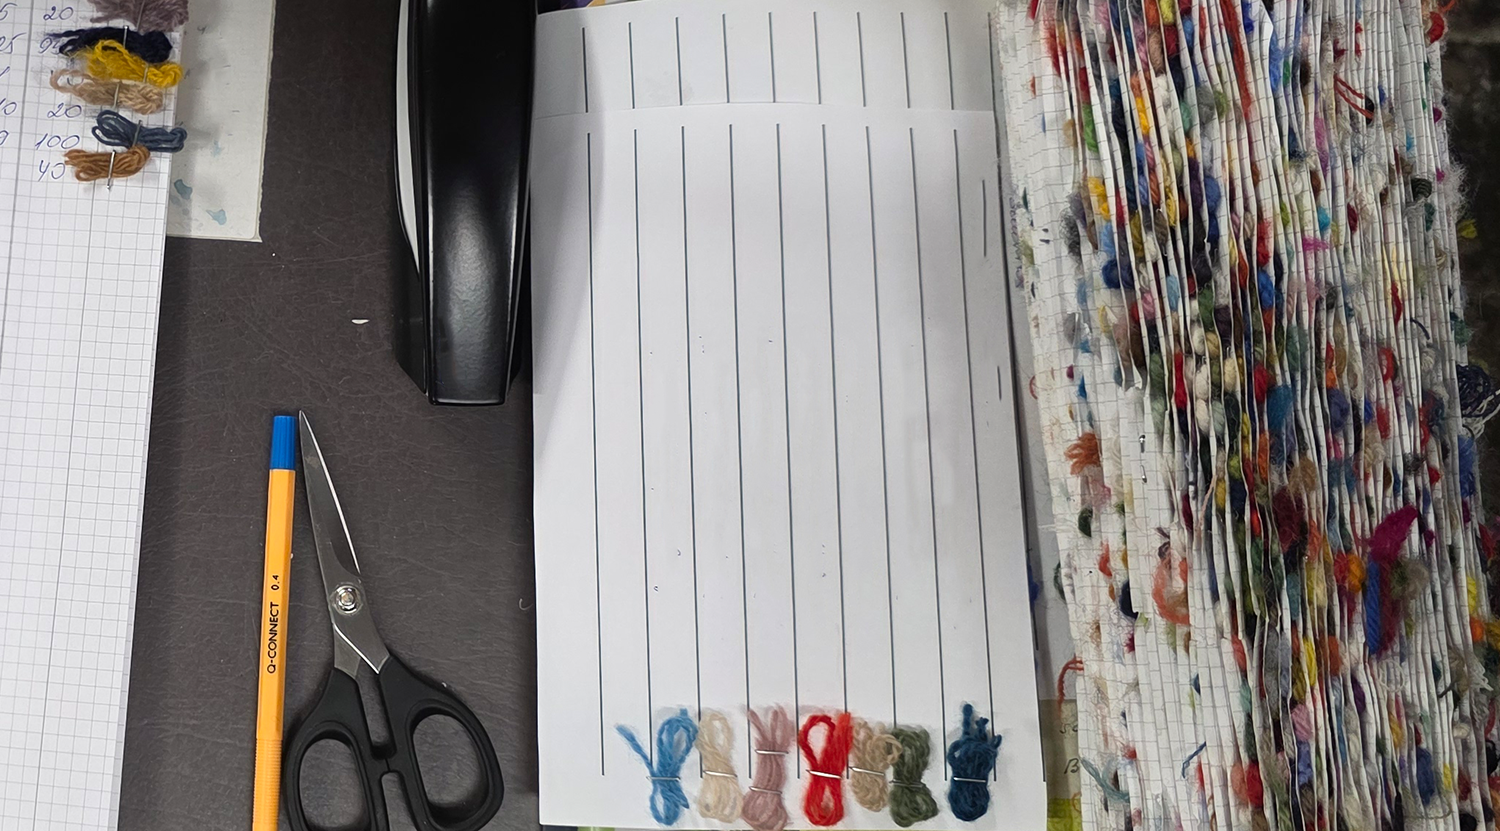
Krāsotas vilnas dzijas referenču katalogs. Attēlā esmu izrediģējis referencēm aprakstus (pielietotās krāsvielu proporcijas, uzskaites kodi un cita specifiska informācija). Pēc šādiem katalogiem arī pēc vairākiem gadiem ražotājs spēj atrast precīzu referenci tam, ko pirms tam jau ir ražojis.
Savukārt maksātnespējīgiem dizaineriem un dizaineru vadītājiem, kuriem ir galva uz pleciem, Pantone piedāvā tā paša TCX kataloga toņu references pielietojumiem digitālajā pasaulē, no kurām tad arī tālāk tiek atvasināti arī citi pielietojumi. Piemēram, atrādīšanai uz aifoniem vai drukai uz papīra.
Pantone 11-4201 krāsas references
sRGB 240, 238, 233
Hex #F0EEE9
Lab 94.14, 0.42, 2.51
Nu lūk, spridziniet, dizaineri. Jums visi vārti vaļā! Bet, bet. A kā šito nodrukāt uz papīra? Ja precīzi, tad nekā. Jo šī krāsas reference vispār tam nav paredzēta un tās pielietošana drukā ir vairāk sevis un iespiedēju mocīšana.
Tomēr ir risinājums arī tiem, kurus tomēr stipri notramdījuši jaunie un stilīgie klienti un Pantone gada krāsa par visām varītēm drukātā veidā nāksies izmantot. Pantone 11-4201 Cloud Dancer tonis ir ļoti, ļoti tuvs klasiskam, krēmīgam papīram, kuru lieto grāmatās.
No tiem paraugiem, kas nu man bija pa rokai, vistuvākais bija Munken Premium Cream — ΔE 2.49 pret referenci. Jā, nav izcili. Bet tik precīzi nodrukāt jau ir izaicinājums. Un pavisam droši varu apgalvot, ka ir arī citi krēmīgie papīri, kurus var mierīgi lietot, lai būtu mums kārtīga deja mākoņos. Respektīvi, vienkārši lietojiet krēmīgos papīrus kā jau gada trendam atbilstošo bāzi un bez galvassāpēm drukājiet pāri saturu.
—
Galvassāpju mazināšanai un vispārējai pārliecībai par to, ka drukā uz papīra mums viss ir kārtībā: iepriekšējo gadu Pantone gada krāsas. Arīdzan no tekstila (kokvilnas) krāsu kataloga. 2016. un 2021. gadā pat tika izdomāts, ka gada krāsas var būt veselas divas.
Ir saprotams, ka nepastāv vairs pārliecinošu argumentu nacionālo laikrakstu lasīšanai — ziņas ir iztirzātas TVNET un Delfu komentāros vēl pirms papīra nokļūšanas iespiedmašīnā. Gluži pretēji ir reģionos. Sēdēšana klasesbiedru vacapā vai ciemata feisītī ir būšana ļoti šaurā burbulī, kurā visu regulē skaļākā balss. Savukārt vietējā laikrakstā ir spēks, jo paustais ir pārlasīts, pārbaudīts un par to uzņemas atbildību.
Mūs Skrīveros iekristīja par gājputniem — atbraucam līdz ar lakšiem un esam projām pie pirmajām ledus glazūrām uz peļķēm. Toties vietējo laikrakstu abonējam jau gadiem. Ir forši profesionāli pieskatītā informācijas forumā smelties aktuālas zināšanas par vidējo malkas cenu, kultūras notikumiem, rosīgiem cilvēkiem, pašvaldības piruetēm un palaidņu izdarībām. Saprast un iepazīt, kā tad kaimiņi dzīvo. Un varbūt dažkārt arī iepazīstināt ar sevi. Jo ir taču iemesls, kāpēc tieši te izvēlamies pavadīt būtisku daļu dzīves.
Avīzes satuvina. Tieši vietējā drukātajā medijā mēs iepazināmies ar Vecbebru biškopības tehnikumu, Jaunjelgavas gastronomijas veikalu Lauva, izciliem lauku kafejnīcu pasākumiem Neretā, Krapes muižas svētkiem, kaislīgiem zemeņu lauku kopējiem un to, ka Skrīveru mājas saldējums ir pieejams AirBaltic lidmašīnu ēdienkartēs. Un mūsu kaimiņš pie mums ciemos ir biežāk, jo arī grib lasīt avīzi. Galu galā. Raugi, pat Dainis Īvāns uzrunā Doma laukumā teica: «Vēl vakar kaimiņš man ieteica ielūkoties Aizkraukles novada avīzes Staburags redaktores ievadslejā».
Tāpēc aicinu tevi saņemties un abonēt drukāto presi. Nopelnīsi no manis milzīgu paldies. Un, ja padomāsi arī par saviem tuviniekiem un savlaicīgi sagatavoties Ziemassvētkiem, dāvinot viņiem vietējās vai nacionālās preses abonementu nākamajam gadam, saņemsi paldies arī no viņiem. Uztver to kā regulāras pastkartes no visiem tiem ceļojumiem, kurus tu jau esi ieplānojis un kuros nekad neiekļausi pasta nodaļas apmeklējumu.
Kā abonēt reģionālo laikrakstu?
Rakstīt un stāstīt par avīzēm 2025. gada nogalē nav viegli. Ja vien tu esi izlasījis tik tālu, tad droši vien māj ar galvu un klusē, lai neierosinātu dialogu un varētu šo tēmu ātrāk slēgt. Un arī abonēt laikrakstu 2025. gada nogalē ir sarežģītāk, nekā man likās. Tā ir kombinācija starp monopolizētu tirgus pieskatīšanu, slinkumu vai nespēju ieviest mūsdienīgus risinājumus un izteiktu tendenci turpināt sēdēt uz desmitiem gadu veciem lauriem, kuri sen vairs nepastāv.
Ātrākais veids abonēt vietējo laikrastu ir ieejot Latvijas Pasta mājaslapā Abone.lv, izvēloties preses izdevumus un tad noformējot pasūtījumu. Superīgā fīča, par ko pastnieki droši ka nebūs sajūsmā — iespēja pasūtīt reģionālo laikrakstu uz jebkuru Latvijas adresi. Visu nākamo gadu Latgales Laiks pienāks mūsu Rīgas dzīvoklī. Bet ir savi mīnusi. Jo abonējot caur pastu būs jāizmet elles loki, lai tiktu pie reģionālās avīzes digitālajām versijām, kad neesi uz vietas.
Otrs variants ir apmeklēt laikrakstu mājaslapas un abonēt redakcijās. Saraksts ar visiem laikrakstiem un to redakciju mājaslapu adresēm ir apkopots tālāk. Tur ir savi, īpaši piedzīvojumi. Jo ne visiem izdevies saprotamu tehnisko risinājumu uztaisīt, citi prasa piezvanīt (OMG, zvanīt!), un ar dažiem būs e-pastos jāapmainās ar laipnībām. Toties te ir iespējamas priekšrocības, kas nav sienas kalendārs par godu gada abonementam.
Piemēram, laikrakstu Staburagsvar abonēt par 9,90 € mēnesī, saņemot laikrakstu pastkastē, mobilajā telefonā un vēl arī piekļuvi fotoreportāžām, iespējai kaut ko dīvainu ierakstīt komentāros un izlasīt pāris gadus vecus rakstus.
Kādas avīzes Latvijā iznāk un cik tās maksā?
No Latvijas pasta abonēšanas katalogiem izdevās savilkt kopā 2025. un 2026. gada datus par laikrakstiem, to abonēšanas cenu gadam ar pārskatu par cenām. Ar nodomu izņēmu ārā visu, kas saistīts ar TV programmām un uz to bāzes veidotajiem pielikumiem, toties atstāju superekskluzīvo Kaleidoskopu, par kura esamību tikai nesen uzzināju. Jā, jūs pareizi sapratāt, avīzes krievu valodā es arī neapskatu. Un angliski iznākošais The Baltic Times jau labu laiku ir žurnāla formātā, tāpēc neskaitās. Citās valodās mums abonējama vietējā prese neiznāk.
Pirmā cena ir, ja abonē kā privātpersona, otrā — kā juridiska persona. Visiem, kam vien bija iespēja, pieliku klāt arī saiti uz laikraksta mājaslapu. Ja juridiskās personas ailē redzi domuzīmi, tad šī laikraksta redakcija vairs nenodarbojas ar dīvaino pieņēmumu «firmām daudz naudas, var atļauties». Realitātē tas nozīmē, ka laikrakstu iznākšanu un abonentu skaitu stutē valsts un pašvaldību budžeti, bet uzņēmumiem labāk laikrakstu abonēt ar avansu norēķinu caur kādu no darbiniekiem.
Sākumā mēģināju tabulas datus ar gudrajiem NotebookLM un ChatGPT apstrādāt, lai nav rociņām nekas jādara. Es zināju, ka modeļi var muldēt. Bet tik pārliecinoši iedot absolūti izdomātus skaitļus — tas bija pārsteigums. Tāpēc visi dati beigās tika pārlasīti rociņām un gan jau kaut kur ir drukas vai pārskatīšanās kļūdas.
Nekas neaizvietos čaklas rokas. Un lasošu sabiedrību.
Attēlus pēc aprakstiem mūsu vietā ģenerē lielie valodu modeļi, roboti iemācījušies dejot, tomēr mēs joprojām nesaprotam un neprotam fiksēt un nodot spektrālo informāciju no idejas līdz taustāmam rezultātam. Spoti, pantoņi, krāsu telpas, spektrofotometri, Mansels un profili. Uzsākšu rakstu sēriju, kurā parunāsim nedaudz par krāsām, materiāliem, druku, krāsu valodām un mūsu spējām to visu uztvert.
Trakākais krāsu vadībā ir tas, ka nav svarīgi, kurā nometnē tu pieklauvēsi, visās būs augstas raudzes speciālisti, kam ir spēcīgi stereotipi, kā darbojas citi ķēdītes posmi. Un ļoti izteikti bieži — gaužām aplami. Dizaineri nesaprot druku, repro neprot optiku, iespiedējs netic materiālu novecošanai, izejvielu ražotāji nav redzējuši drukas procesus un klientu konsultanti nesaprot nevienu un neko, jo tā ir ērtāk visiem pārējiem, kad jāmeklē vainīgais.
Kā tas viss sākās?
Pirmos pastāvīgos un noturīgos attēlus cilvēce iemācījās zīmēt alās uz sienām. Pēc tam iemācījās sajaukt pigmentus un saistvielas tā, lai mamuta kaislīga rīvēšana gar sienu nenotīrītu vēsturisko medību ainu. Paralēli nāca arī apskaidrība, ka zīmēt kaujas ornamentus uz vaigiem un krāniņus mamutus uz sienām nav gluži tas pats — krāsvielas dažādi uzsūcās materiālos, pirmajam jābūt ļoti elastīgam, savukārt otrajam — noturīgam.
Kad izsalkusī alu cilvēku grupa kaut kā saņēmās un tika galā ar šo informācijas daudzumu, no kaimiņu cilts aiz matiem atvilktajam laupījumam uz kājas atklāja vēl neredzētas krāsas zīmējumu. Un cilvēks saprata, ka var ne tikai skatīt, bet arī attēlot dažādās krāsās. Pēc būtības tas ir tas brīdis, kad mēs varam atzīmēt pirmā spota krāsu kataloga dzimšanu. Turklāt tajā laikā katalogi tapa gaužam dabīgi — ko nu var apzīmēt, to arī apzīmē. Un tā arī saprot, kā konkrētā krāsa uz šī materiāla izskatās. Visas references tiek staipītas līdzi un to, ko nevar nodot no paaudzes paaudzē, cilts šamanis pārzīmē un atjauno. Gan jau ka katru reizi radot atkal kaut ko pavisam citu. Jo visas references ir galvā.
Tālākos gadu tūkstošus izmaiņas bija samērā paredzamas un ļoti, ļoti lēnas. Eksperimentālā kārtā, tostarp bieži vien saindējoties un nomirstot, tiek atklāti arvien jauni pigmentu un krāsvielu veidi. Ik pa laikam radot tik īpašus toņus, ka grūti noticēt to eksistencei. Ēģiptē tas bija zilais, Mezopotāmijā — koši sarkanais, bet Ķīnā — abas šīs krāsas, tika nedaudz citādākā tonī. Tā radās pirmie «idioti, kas nepareizo katalogu lieto», jo vainas novelšana uz tiem neprašām, kas monitorus nekalibrē, vēl pāris tūkstošus gadu būs jāpagaida.
Ola uz ķilavas garšo savādāk kā ķilava uz olas
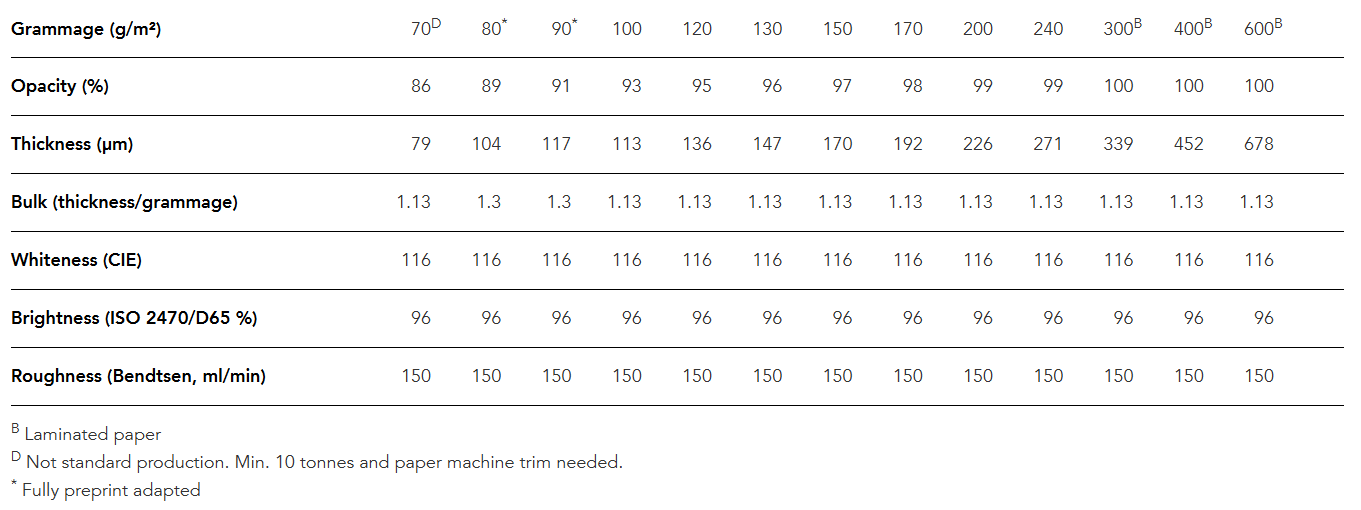
Jaunajiem un talantīgajiem dizaina un drukas entuziastiem sarunas par materiāliem sākas ar pārklātiem un nepārklātiem papīriem, masā krāsotiem specmateriāliem un aptuveni šādām tabulām:
Cool. Bet vispār nepalīdz, kad gaisīgā un košā zilā fona vietā ir nodrukāts kaut kāds džinsu grīdas lupatas pelēkzilais. Un kā jau minēju raksta ievadā — pilnīgi visiem iesaistītajiem būs sava taisnība, kāpēc ir noticis tā, kā tas ir noticis. Vēlme bija tiktoka kanāla loguča #00B3FF krāsu izmantot kā fonu lojālāko skatītāju Ziemassvētku kalendāram. Bet sanāca saņemt skaidrojumu, ka izvēlētais dārgais, pelēcīgais dizaina papīrs gluži vienkārši nav piemērots spilgtu toņu drukai. Jo iespiedkrāsa daļēji iesūksies materiālā, veidojot materiāla un krāsas sajaukumu. Savukārt biezā slānī klājot to pāri materiālam, piemēram, uzspiežot folijas transfēru, pazūd paša materiāla jēga. Jo tā optiskās un taustāmās īpašības nu ir paslēptas zem dekoratīvā slāņa. Tāpēc mēģināsim saprast, kas tad vispār ir dekorējamie materiāli.
Krāsviela ar materiālu vai sasaistīties 3 dažādos veidos: uzklājot to uz materiāla, daļēji iesūcinot to materiālā un pilnībā nokrāsojot materiāla.
Uzklāšana uz materiāla ir kā desas šķēles uzlikšana uz maizes. Desmaizes šķērsgriezumā ir ļoti vienkārši atšķirt, kur sākas salami un beidzas maize. Lūkojoties uz desmaizi no augšas, varam tikai minēt, vai zem salami šķēlēm šoreiz netika aizmirsti kaperi. Tātad pēc būtības salami un maizes šķēle dzīvo katra savu dzīvi arī pēc kļūšanas par desmaizi.
Dekāldruka uz keramikas, digitālā pigmentdruka uz audumiem, rotācijas sietspiede uz tapetēm, tonerdruka uz papīra, pārtikas sīrupkrāsu druka uz kūkām, folijas krāsvielas slāņa pārnešana ar termoklišejām, visu veidu transfērdruka uzklājot krāsu uz plēves un tad pārspiežot uz materiāliem, digitālā UV druka, jebkura druka pa tiešo uz plastmasas vai metāla. Sarakstu varētu turpināt, bet pievērsīsim uzmanību tieši pēdējam piemēram. Ar metālu viss tā kā skaidrs. Ja uz tā uztriepj DM logo, tad skaidrs, ka tas ir uz materiāla. Lai tas būtu iestrādāts metālā, logucis būtu jāieskrāpē ar naglu. Un šo sakarību civilizācija ir iemācījusies lietot ap to pašu laiku, kad pārvācās no alām uz teltīm.
Materiālus var speciāli apstrādāt, lai tos apdrukājot, krāsvielas neiesūcās. Piemēram, papildus krītot un kalandrēt papīra virsmu (lasi — padarīt papīru blīvu un spīdīgu) vai arī apstrādāt audumu, pievienojot šķidrumu bloķējošu slāni (Gore-Tex, brezents un citi lamināti) vai arī nolakot keramiku, lai likvidētu porainumu. Celtniecībā to pazīst ar terminu gruntēšana. Var pievienot trasfērdrukas krāsas slānim karstlīmes pulveri, kas būs saistviela starp materiālu un attēlu, tai pat laikā bloķējot iespiedkrāsas iespējas iesūkties materiālā. Ir vēl kaudzīte akrobātikas, ko var veikt iespiedkrāsu pusē, bet par to patērzēsim citreiz.
Uzklāšana ar daļēju iesūkšanos materiālā ir kā dārzeņu fritēšana — no ārpuses viss ir kraukšķīgs, bet iekšpusē jau atkal palicis neizcepies. Un var vāļāt salvetēs līdz nelabumam, bet tāpat viss būs eļļains. Šai drukas metodei ir divas ļoti lielas priekšrocības pret klāšanu uz virsmas: būtiski palielinās gan apdrukājamo materiālu klāsts, gan arī izmantojamās drukas tehnoloģijas. Bet tagad nozīme ir arī vienai būtiskai niansei, par kuru iepriekš jau stāstīju piemērā ar tiktokeri — dekorācija vairs nav tikai iespiedkrāsa, tagad tā ir materiāla un iespiedkrāsas kombinācija.
Ar putekļus krājušo HP printeri nodrukātai kolēģu fotogrāfijai ir ne tikai diskutabls saturs, bet arī iespēja pačamdīt sakrokotā astoņdesmitgramīgā ofisa papīra raupjumu, kas ir uzņēmis par daudz mitruma un deformējies. Nonākam pie nākamās atziņas — vairums papīra apdrukas, ieskaitot avīzes, žurnālus, grāmatas un plakātus — ir apdruka, kas veikta drukas slānim daļēji iesūcoties dekorējamā materiālā. Līdzvērtīgi atklājumi sagaida, ieraugot sietspiedē nodrukāta t-kreklā iekrāsotus auduma savēlumus. Arī zebras un joslas uz asfalta uzklāj, krāsai daļēji iesūcoties materiālā. Un uz šī piemēra visvieglāk būs saprast, ka dekorācijas slānis patiesi var būt iespaidīgi biezs. Tomēr būtiski ir apzināties, ka pārvietoties daudz patīkamāk un drošāk ir pa asfaltu un svaigi uzklātā gājēju pāreja ir ideāla vieta, kur paslīdēt. Bet, ja krāsas slānis būs pārāk plāns, tas kopā ar asfaltu pārāk ātri nodils. Tāpēc ievārījums tiek klāts dāsni.
Materiāla krāsošana, dēvēta arī par krāsošanu masā, tika izgudrota stipri agrāk par zebru un asfalta virsmu dilemmu. Tā darbojas kā mammas salāti — ir ļoti, ļoti garšīgi un visa ģimene ēd bez izņēmumiem, bet labāk nezināt, no kā tie sastāv. Galvenā šīs metodes priekšrocība — neatkarīgi no tā, kā tiks stiķēts vai apstrādāts materiāls, nedekorētā materiāla daļa viscaur būs vienā tonī šķērsgriezumā (grāmatas bloka malas), saraujoties (dzija), dilstot (dažādi cietie polimateriāli), staipot (audums) vai kā citādi ar to dauzoties. Jā, arī papīra celulozes, kokvilnas audumu un vilnas dzijas balināšana pēc būtības ir materiāla krāsošana masā.
Vēl viena superīga lieta, ko var iegūt ar krāsošanu masā — pietiekami ilgi ieslēdzot vienā telpā bariņu ķīmiķu un fiziķu kopā ar dekorēšanai izvēlēto vielu, to var dabūt praktiski jebkurā krāsā. Izņemot linu. Lins ir čakars.
Dikti jau nepalīdz šito visu zināt, ja tāpat nav skaidrs, ko ar to visu iesākt. Iesākt vajadzētu ar gala iznākuma formulēšanu. Kad ar to ir tikts galā, var izvēlēties materiālu. Piemēram, ja noklāsim papīru ar hologrāfisko laminātu un tad uz tā drukāsim, ir pilnīgi vienalga, kādā krāsā ir papīrs. Galvenais, lai lamināts pie tā labi turas. Ceļazīmei nav būtiskas taktilās īpašības, bet materiālam jābūt gaismu atstarojošam un krāsai jābūt ilgstoši izturīgai pret Saules gaismu un laikapstākļiem. Papīru nemazgā, tomēr kapilārās īpašības ir būtiskas, lai iespiedkrāsas nekontrolēti neizspiestos cauri materiālam. Auduma krāsošana masā ierobežo to, kā to tālāk var apdrukāt. Un UV druka bez papildus fiksācijas neturēsies uz lielas daļas virsmu.
—
Rakstu sēriju sāku ar dekorējamā materiāla definēšanu. Nākamajos rakstos pievērsīšos dažādām mūsdienās izmantojamām drukas metodēm, krāsu telpu aprakstiem, krāsu katalogiem un sistēmām kā arī praktiskā pielietojuma piemēriem. Un ja nu tev ir izdevies tikt līdz šai rindkopai, tad droši komentāros atstāj ziņu arī par citām tēmām, kuras būtu vērts apskatīt.
Bija agrs rīts. Anna sēdēja uz gultas malas no pleciem noslīdējušā, atpogātā kleitā un nošļukušās zeķubiksēs. Viņa vēl nebija paguvusi nomazgāt seju un neķemmētās matu pinkas nodevīgi atklāja nemierīgo nakti.
Rokās viņa turēja glāzi ķiršu kompota, kas pēc skata atgādināja lielisko Doro ielejas portvīnu.
Sejā bija skaidri nolasāms naids pret visu pasauli. Viņa gribētu izkliegt «Kretīni! Kā jūs man esat izbesījuši ar savu nolādēto dārziņu!», bet nevarēja. Anna vēl neprata izrunāt burtu «r».
Ugunsmūris, paroļu pārvaldnieks, lieko paziņojumu atslēgšana, drošu saziņas rīku izvēle un divfaktoru autentifikācijas lietošana ar prātu jau būtiski samazina iespēju kļūt par kiberuzbrukuma upuri. Un pats labākais — tie ir disciplīnas, nevis finansiālo iespēju jautājumi.
Pēdējos gados Latvijā uzbrukumi IT sistēmām vairs nav kaut kas, par ko lasa tikai ārzemju ziņu apskatos. Īpaši kopš 2022. gada situācija ir kļuvusi trakāka, tomēr arī pirms tam negāja spoži. Turklāt ir jāapzinās, ka pavirša attieksme pret IT drošību ir ne tikai tiem, kuri datoru un telefonu lieto jūtūbam un engrībērtdiem, bet arī lielos uzņēmumos ar nopietnu apgrozījumu. Tāpēc es nolēmu apkopot dažus tehniski vienkāršus, bet ļoti efektīvus risinājumus, kā būtiski uzlabot savu/uzņēmuma kiberdrošību. Skaidrs, ka tūdaļ uzradīsies vēl 100500 padomdevēji ar vēl labākiem risinājumiem, kurus pavisam noteikti var un vajag pievienot komentāros.
Uzliec DNS ugunsmūri visām ierīcēm
Ja nav pacietības uzreiz pieķerties nopietniem uzlabojumiem, vismaz uzliec DNS Ugunsmūri. Tas darbojas kā filtrs, kas bloķē piekļuvi lapām, kuras CERT.LV ir atzinis par krāpnieciskām vai ļaunprātīgām. Piemēram, kāds atsūta e-pastu ar bankas saiti, tu klikšķini, un parasts internets tevi aizved uz viltotu lapu. DNS Ugunsmūris tevi vienkārši neielaidīs šajā lapā.
Šis strādā datoros, telefonos, planšetēs. Tāpēc DNS Ugunsmūri vajadzētu uzlikt visiem ģimenē un kolektīvā, it īpaši visiem tehnoloģiski kautrīgajiem.
Aizmirsti USB fleškas tāpat, kā esi aizmirsis disketes
Jebkurš datu nesējs, kas tiek piesprausts pie datora, mūsdienās ir tikpat drošs kā nejauša garāmgājēja piedāvātā konfekte. Ir praktiski neiespējami atrast tādu ārējo datu nesēju, kas nevarētu būt vīrusa nēsātājs, un tas attiecas arī uz telefonu, ko piespraud pie datora «tikai, lai uzlādētu».
Jebkuru prezentāciju, atskaiti vai fotogrāfijas no brīvdienu pasākuma var bez maksas izvietot failu apmaiņas servisos, ja tie neielien e-pastā. Pašmāju Failiem.lv ir pilnīgi pietiekams lielākajai daļai situāciju. Tomēr rēķinies, ka atkarībā no tā, ko saspaidīsi uzstādījumos, datus var redzēt arī citi cilvēki. Piedomā pie tā.
Lieto paroļu pārvaldnieku, nevis atmiņu
Par universālo paroli bīstamāka ir vienkārša universāla parole. Kā joko IT drošības speciālists Kirils Solovjovs no Possible.lv: «Jālieto parole 12345678. Tā ir vispopulārākā un tik daudz cilvēku nevar kļūdīties».
Paroles nedrīkst glabāt teksta dokumentos, uz lapiņām pie klaviatūras vai vacapa sarakstēs. Drošākais veids paroļu glabāšanai ir paroļu menedžeri. Un nav obligāti (kaut vēlams) jāmetas iepazīt Bitwardenvai Keeper. Paroļu menedžeri jau eksistē gan Google, gan Apple. Un tie labi draudzējās ar datoru un telefonu. Atliek tikai sākt lietot. Un ir pavisam droši izmantot ieteiktās paroles jaunajiem servisiem.
Cik bieži mainīt paroles? Sāc ar to, ka uzreiz pēc reģistrēšanās un pirmās veiksmīgās pieslēgšanās jebkuram servisam — uzreiz nomaini paroli. Ja esi pa ausu galam dzirdējis, ka kāds no tevis lietotajiem pakalpojumu sniedzējiem ir kompromitēts — nomaini paroli. Ja esi pārpratuma pēc kaut kur ievadījis savus datus un neesi pārliecināts, vai tas bija autentisks serviss — nomaini paroli. Ja lieto servisu gadiem un nekad neesi uztraucies par drošību — nomaini paroli. Un taisi tās sarezģītas, un glabā paroļu servisos.
Ja nevari atcerēties, cik sen esi mainījis paroli un vai tā vēl ir droša — nomaini paroli.
Ne visai biometrijai var uzticēties
Uztaisi pašportretu ar datora vai telefona kameru. Tieši tik kvalitatīvi ir dati, ar kuriem atpazīst tavu seju. Desmit gadus vecas kameras var apmuļķot, pieliekot sejas vietā fotogrāfiju.
Pirkstu nospiedumu lasītāji ir stipri prasīgāki apmuļķošanai. Tas pats ar acs zīlītes lasītājiem. Ja pastāv iespēja, labāk lieto tos. Vienkāršākais veids, kā būt drošam — pārliecināties, ka iekārta nav vecāka par 3 līdz 5 gadiem un tai ir pēdējo mēnešu laikā bijuši programmatūras drošības atjauninājumi. Gadījumā, ja kaut kas no tā iztrūkst, biometriju vienu pašu labāk nelietot.
Un atceries, ka tad, kad Samsung vai Apple pasaka, ka ir uzlabojuši drošību saviem autentifikācijas rīkiem, tas visticamāk attiecās uz jaunākajiem iekārtu modeļiem, kas vēl nemaz nav tavā kabatā.
Atslēdz paziņojumu troksni telefonā
Nesaprotamu iemeslu dēļ cilvēkiem patīk, ka to iekārtās nedozētā daudzumā tiek piegādāti paziņojumi no benzīntanku un lielveikalu aplikācijām, atlaižu/akciju ziņas no tiešsaistes veikaliem, nemaz nerunājot par spēlītēm un sociālajiem tīkliem. Nav brīnums, ka šo paziņojumu jūrā pazūd notifikācijas par neautorizētiem maksājumiem vai viegli tiek palaists garām, kad autorizācija pieprasīta brīdī, kad kādam no kontiem piekļūt vēlas krāpnieks.
Visi paziņojumi, bez kuriem var iztikt, ir jāatslēdz. Jūsmojumi par ierakstiem feisbukā nepazudīs. Kendīkrešu vairs neviens nespēlē un Bukinga piedāvājums vēl vienai rezervācijai Igaunijā tev vairs nav aktuāls, jo tu tur jau biji. Amazon tev tirgos vēl vienu olīveļļas bundžu, bet tev vēl tikko nopirktā nav atnākusi. Neko no tā tev nevajag. Un, ja nu tomēr vajag, to var pieslēgt uz laiku.
Filtrē ienākošos e-pastus mapēs
E-pastos izmanto filtrus, lai darba, skolas un arī ģimenes loka e-pasti nonāk atsevišķās mapēs. To piedāvā jebkurš mūsdienīgs serviss kopā ar pamācībām, kā to izdarīt. Ja kaut kas izliekas nācis no zināmām adresēm, bet nav iekritis mapēs, tas ir drošs signāls būt papildus piesardzīgam.
Vienlaikus ņem vērā, ka ne visas organizācijas ir veikušas priekšdarbus, lai to e-pastus nevarētu viltot un atsūtīt no it kā īstās adreses. Arī, lasot sašķirotos e-pastus, pielieto veselo saprātu.
Izvairies no SMS lietošanas un esi ļoti piesardzīgs balss saziņā
SMS ir novecojis un nedrošs saziņas veids. Vēl Skype ziedu laikos īsziņas varēja nosūtīt, uzdodoties par jebkuru telefona numuru vai pat aizstājot numuru ar jebkādu vārdu. Nekas nav mainījies un tā ir joprojām. SMS ir viens no vienkāršākajiem veidiem, kā apmānīt saņēmēju un izlikties par banku, kaimiņu, mazbērnu vai pat drošības iestādi.
Paskaties savus ienākošos ziņojumus un padomā, kā katram no sūtītājiem var mainīt saziņas kanālu. Bankām un kurjeriem ir savas lietotnes. Ome ir pelnījusi viedtālruni ar drošām, autentificējamām sarakstes aplikācijām.
Gan SMS, gan telefonzvanu vietā privātajā sarakstē labāk izmantot saziņas platformas — piemēram, Signal vai WhatsApp. Arī videozvans Google Meet vai Microsoft Teams būs drošāka alternatīva, lai izvairītos no personības viltojumiem.
Divi faktori nav drošība, ja tos dala trīs cilvēki un to vajag ātri
Es biju pilnīgi pārliecināts, ka tie laiki ir beigušies, kad grāmatvede ievada maksājumu, bet vadītājs kaut kur pludmalē apstiprina to internetbankas uzlecošajā logā. Bet nē, šis attālinātās uzticības sporta veids vēl dzīvo un plaukst. Un ne tikai bankās — to izmanto arī, lai pieslēgtos Latvija.lv, Eparaksts.lv vai VID EDS sistēmai.
Zelta likums: ja uz ekrāna parādās pieteikšanās pieprasījums, un tu tajā brīdī nekur nepiesakies — nekavējoties noraidi pieprasījumu un sāc domāt, kurš un kāpēc mēģina izlikties par tevi. Un, lūdzu, nedod citiem savus otrā faktora rīkus, jo tad tā vairs nav autentifikācija — tas ir joks.
Ja šis viss šķiet pārspīlēti, atceries: IT drošība reti mirst ar skaļu sprādzienu. Parasti tā aiziet klusi — ar vienu paviršu klikšķi.
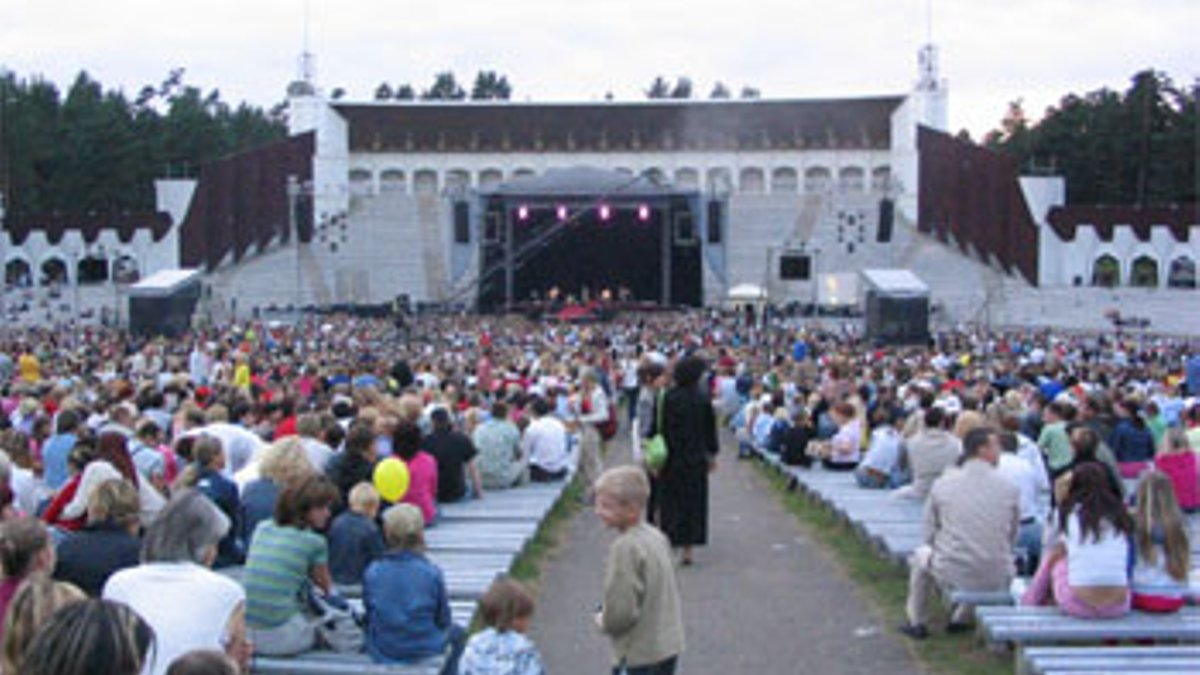
Tā bija 2005. gada 21. augusta nakts. Pareizāk sakot jau bija 22. augusta pirmās stundas. Apkārušies ar fotosomām, mēs nesteidzīgi pametām Mežaparka estrādi, kur tikko bija aizvadīti vēl vieni Dziesmusvētki. Tā par Prāta vētras uzstāšanos 40 tūkstošu priekšā nākamajās dienās rakstīs mediji, kuriem mēs vēl tikai nesām fotogrāfijas.
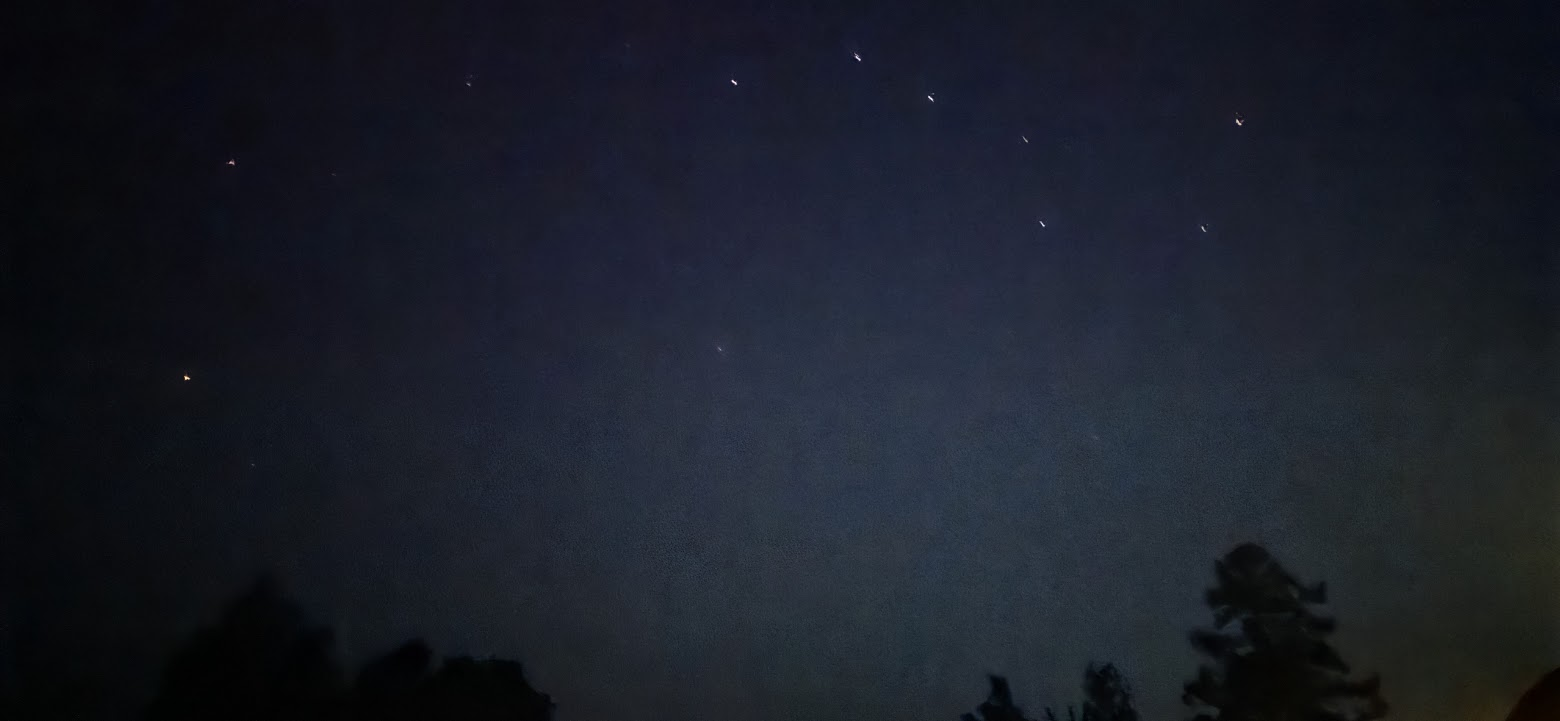
Savlaicīgi tika pieņemts stratēģiski būtisks lēmums pēc koncerta izbaudīt vēl pāris alus aizskatuvē. Tāpēc parka teritorijā tagad bijām klusumā un ceļa virzienu mums izgaismoja pilnmēness, nevis Rīgas gaisma.
—Kamēr mobilajos nebūs iebūvēts tūristu prīmuss vai vismaz šķiltavas, to nekad nevarēs nosaukt par multifunkcionālo telefonu. Ar sūdīgu internetu un e-pastu tas nav nekas vairāk kā biznesa bezvadu telefons. Visi tie ar pilnajiem spiedpogu plakandēļiem ir plaukstdatori un neviens normāls cilvēks to zvanīšanai nelietos. Tu stādies priekšā, ka kāds zvanītu no klaviatūras vai peles?
Es neatceros, vai telefonu no kabatas izvilka Kristaps vai Uldis, bet te nu tas bija. 2 megapikseļu Sony Walkman oranžais brīnums, pavērsts vienīgā redzamā debesu ķermeņa virzienā. Pāris veiklu darbību ar bīdpuļķi un pogām, līdz krāsainajā ekrānā ir redzams gaišs, paplūdis pikseļu kopums ar iespaidīgu zilganzaļu jpg kompresijai raksturīgu halo uz tumša fona.
—Re. Mēness. Nav nemaz tik slikti.
—Nu šo no tevis pavisam noteikti neviens medijs nenopirks publikācijai.
—Un ja tu tagad vilktu ārā vienu no saviem kanoniem, skrūvētu virsū objektīvu un stutētu to nakts vidū uz statīva, lai uztaisītu iespaidīgu kadru un no rīta ieskenētu to redakcijā. Kas no tā mainītos? Kāds to uzreiz gribēs pirkt?
—Tiesa. Tātad viena no multifunkcijām mobilajam ir palīdzēt iereibušiem koncertfotogrāfiem, kas melanholiskas romantikas apsēsti taisās iemūžināt svarīgo Mēnesi, bet ir pamatots slinkums tamdēļ vērt vaļā fotosomu ar saturu Rāviņa Volvo vērtībā. Tomēr piekritīsi, ka iebūvētas šķiltavas gan nenāktu par ļaunu.
—Mums vēl palika cigaretes?
Iesildītāju uzstāšanās pirms 2005. gada 21. augusta Prāta Vētras koncerta Mežaparkā. Foto: Andrejs Veitners, Delfi.
***
Visnotaļ iedvesmots no Kaspara pēdējā laika grafomānijas izpausmēm, nevaru noliegt, ka esmu gana noilgojies pēc paša neizmantotās iespējas uzrakstīt kaut ko garāku par tvītu. Un kaut ko iespaidīgāku par svaigākās drukātās preses fotogrāfiju no kādas apmeklētās pasaules malas.
Jāsāk jau ar apņemšanos. Tātad, apņemšanās ir ieturēt regularitāti ar vismaz diviem ierakstiem mēnesī. Tāpēc tagad bus jāstrādā pie satura stratēģijas, kuru no padsmit drafta stadijas rakstiem diez vai var izspiest. Droši, ka pačīkstēšu par notikumiem drukā, jaunumiem nozarē un foršām pamanītām lietām. Gan jau ka pa vidu iesprauksies arī kaut kāds tehnisks raksts angliski par īpaši sasāpējušām tēmām.
Tehniski man te vēl čupa mājasdarbu jāizdara, lai sakoptu šo sen neravēto dārziņu: — Sapucēju paskatu uz kaut ko mūsdienām piemērotāku (jā, tagad ir jābūt ērti lasīt arī no telefona). — Izvācu čupu spraudņu, kuru jēgu stipri apšaubīju jau stipri sen. — Izvācu reklāmas, kas bija salipušas šo pašu spraudņu dēļ. — Gandrīz sapratu, kā darbojas jaunā WordPress tēmu rediģēšana.
Gan jau ka neatteiktos no palīdzības to visu sapucēt vēl sakarīgāk, jo tehnisko speceni sagatavot būtu sīkums. Bet pašam to visu paveikt būtu baisais slinkums.